
• Home
  • Galleries
  • About
  • Blog
    • Photography Explained
      • Evolution of Camera Technology
        • Camera Obscura (1500)
        • The Daguerreotype Camera (1839)
        • The Kodak Brownie (1900)
        • The Reise Camera (1900)
        • The Leica I (1925)
        • The Kodak Duaflex (1947)
        • The Polaroid Model 95 (1947)
        • The SLR
        • The Kodak Digital Camera
        • The DSLR
        • Mobile Camera
        • The Action Camera
        • The Mirror less Camera
      • Understanding Your Camera
        • DSLR Explained
        • Lens Explained
        • Megapixel
        • Shutter
        • Aperture
        • ISO
        • Focus
        • Metering
        • White Balance
        • Image Quality
        • Shutter Release Mode
      • Understanding Exposure
        • Exposure
        • Exposure Triangle
        • Exposure Modes
        • Exposure Compensation
        • Exposure Bracketing
        • Histogram
        • Aperture and Depth of field
        • Shutter Speed and Motion
        • Chromatic Aberration
        • Lens Diffraction
        • Hyper Focal Distance
      • Camera Accessories
        • Tripod
        • Tripod Head
        • Filters
        • Flash
        • Camera Bag
    • Equipment Reviews
    • Travel Stories
    • Tips & Tutorials
      • Photography
      • Travel
  • Contact
FOTOVOYAGE
FOTOVOYAGE
  • Home
  • Galleries
  • About
  • Blog
    • Photography Explained
      • Evolution of Camera Technology
        • Camera Obscura (1500)
        • The Daguerreotype Camera (1839)
        • The Kodak Brownie (1900)
        • The Reise Camera (1900)
        • The Leica I (1925)
        • The Kodak Duaflex (1947)
        • The Polaroid Model 95 (1947)
        • The SLR
        • The Kodak Digital Camera
        • The DSLR
        • Mobile Camera
        • The Action Camera
        • The Mirror less Camera
      • Understanding Your Camera
        • DSLR Explained
        • Lens Explained
        • Megapixel
        • Shutter
        • Aperture
        • ISO
        • Focus
        • Metering
        • White Balance
        • Image Quality
        • Shutter Release Mode
      • Understanding Exposure
        • Exposure
        • Exposure Triangle
        • Exposure Modes
        • Exposure Compensation
        • Exposure Bracketing
        • Histogram
        • Aperture and Depth of field
        • Shutter Speed and Motion
        • Chromatic Aberration
        • Lens Diffraction
        • Hyper Focal Distance
      • Camera Accessories
        • Tripod
        • Tripod Head
        • Filters
        • Flash
        • Camera Bag
    • Equipment Reviews
    • Travel Stories
    • Tips & Tutorials
      • Photography
      • Travel
  • Contact

Once we understood the exposure compensation, let’s try to understand Auto Exposure Bracketing (AEB). We try to under or over expose in some situations to get the best possible result. Let’s consider a scene where the light difference between the dark past of the scene and brightest part of the scene is too much (also called high dynamic range),then it becomes difficult for the camera to capture details of the entire image.

In exposure compensation, we need to setup the value of the stops we want to under or over expose and the camera automatically adjust the value. In exposure bracketing the camera takes one stop over and one stop under then the exposure value your camera automatically picks up. This results in 3 images. One proper exposure, one under exposure and one over exposure. The advance DSLRs can handle exposure bracketing up to 9 stop. 1 proper, 4 under (one stop each) and 4 over (one stop each). Further you can fine tune it to half stop or 1/3 of a stop compensation. It is always advisable to bracket your exposure, particularly when you are not sure about the automatic exposure suggest by your camera.
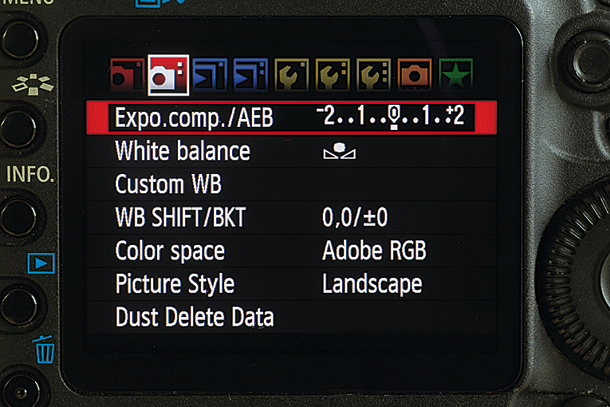
Exposure bracketing can also be done in the manual exposure mode of your camera. The camera automatically adjusts the shutter speed to bracket the images.

People ask why do you need to bracket the exposure particularly when we are shooting in digital format and that too in RAW. The answer is very simple. It is easier to recover the shadow then highlight. However, when recovering the shadow area in RAW, it results in grain. Therefore, it is always advisable to bracket image and pick one as per your requirement. It is ensuring that you don’t miss the shot.
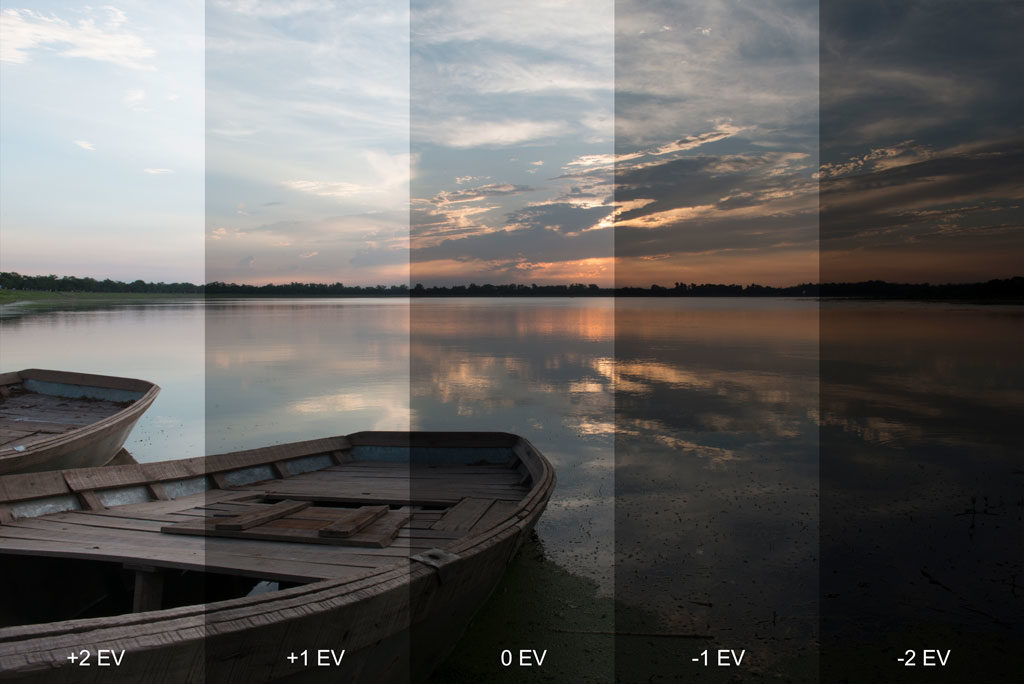
In the above image, exposure bracketing done with 5 images. The details of the boat and the ground can only be achieved in +2 stop image. However, the colors of the sky are lost. Similarly, in -2 stop image, the water is too dark but the sky is nicely exposed. We have chosen one image as per our artistic interpretation. Therefore it is always advisable to use exposure bracketing function so that we have options to choose from.
  • Share On Facebook
  • Tweet It


  • Transform Your Imagination to Imagery.

  • Please authorize with your Instagram account here
  • Follow Us On


© 2027 Copyright FOTOVOYAGE | All Rights Reserved